Yes, a Light Spring can go full festival-maximalist. This guide gives you three looks, ordered easiest to most advanced: a glitter-drenched peachy pink eye, a graphic coral comet, and a hand-painted wildflower garden. Every one stays inside the warm, light, clear palette, so the sparkle and color amplify your face instead of fighting it.
Find your color season and get a personalized eye look from a selfieThe three looks at a glance
Pick by the vibe you want and the steadiness of your hand. Every look is built from one Light Spring seasonal palette, so you can borrow elements across them without ever leaving your season.
| Look | Vibe | Lead color | Sparkle | Difficulty |
|---|---|---|---|---|
| Sugar Rush | Glitter-drenched showstopper | Peachy pink and coral | Full champagne lid | Intermediate |
| Comet Storm | Crisp multi-line graphic | Soft blue and coral | Champagne inner lid | Advanced |
| Wildflower Riot | Painted botanical garden | Leaf and grass green | Champagne center | Advanced |
New to lid, crease, and outer-V? Our eyeshadow placement guide maps where each shade goes. Three formulas do all the work across these looks, so reach for the right one at each step:
- Pressed powder shadow for the color fields, washes, and crease work.
- Glitter shadow (pressed glitter, or glitter suspended in a bonded gel or cream base) for every bit of sparkle. The bonded formulas grab the lid and set in place, so you never need loose glitter on glue near the eye.
- Liquid eyeshadow or a colored gel or liquid liner for the fine detail powder cannot manage: florals, stems, the comet line, confetti dots, and micro-stars. Skip face paint here, it is not made for the eye area.
Three festival directions, one Light Spring palette: a glitter showstopper, a graphic comet, and a painted botanical, ordered so you start with an early win and build up to the most detailed look.
Not sure you're a Light Spring? Find out from one selfie
BeautySpark confirms your color season and builds eye looks around your Light Spring palette.


Look 1: Sugar Rush
Pink-led, glitter-drenched, and graphic all at once, this is the showstopper of the set and the friendliest place to start. The base is a simple wash, and the only real step-up is the doubled wing.
Light Spring Palette
Best Colors
Neutral Colors
Difficulty: Intermediate. The wash and crease are beginner-friendly; the doubled wing is the one step-up.
- Prime and base. Press a thin layer of eye primer over the lid, let it tack. Wash peachy pink #F6C3B0 over the whole lid, then build apricot coral #F3A892 into the crease and outer V with a fluffy brush. Tap off excess first so the edge stays diffused.
- Blow out the pink halo. While you are still in powder, diffuse apricot coral #F3A892 up into the socket in small circles, fading as you climb. Set the soft cloud now, before any hard line exists to protect. (You will place the coral line against it in step 4.)
- Lay the glitter base and drench the lid. Press champagne glitter shadow #E8C98F densely across the mobile lid, over a sheer matching cream base if you have one. Press, never sweep. Do the messy, fallout-heavy work now while there is nothing crisp to ruin. Do your under-eye cleanup and concealer sweep after this to catch all the fallout in one pass.
- Draw the graphic double wing. Now switch to peach coral #F58A6E gel or liquid liner. Elbow anchored, chin up. Pull the sharp wing from the outer corner in short connected strokes, and float the second coral line above the crease, parallel, sitting against the halo you already blew out. Carve any wobble back with a flat brush and concealer. The line goes on clean and stays clean because nothing messy comes over the top of it now.
- Pop the inner corner. Press buttercup #F3D98A glitter into the inner corner and inner lid, melting into the champagne.
- Paint confetti detail. Fine brush, liquid shadow or gel liner. Scatter peach coral #F58A6E and buttercup #F3D98A dots and micro-stars along the top edge of the coral graphic, trailing to the temple. Let each dry before the next.
- Dramatize the lower lash line. Smudge apricot coral #F3A892 along the full lower line, run a thin peach coral #F58A6E line under it, buttercup #F3D98A dot at the outer corner, champagne #E8C98F flecks along the lashes.
- Define in camel. Tightline the upper lash line and reinforce the wing base with warm camel #C9A57C tucked under the coral. No black.
- Finish with lashes. Full dramatic brown lashes, last hit of champagne glitter into the inner corner.
- Finish the face by hand. Warm peachy-coral blush high on the cheek, glossy coral lip.
Sugar Rush is the maximum-impact Light Spring festival eye: a full champagne glitter lid, a doubled coral wing, and painted confetti, all built from warm shades with the blush and lip added at the end.
Look 2: Comet Storm
A soft blue lid with a layered coral graphic streaking off the outer corner like a comet. This one lives or dies on clean lines, so a steady hand matters more than speed.
Light Spring Palette
Best Colors
Neutral Colors
Difficulty: Advanced. The floated lines reward patience and a steady hand.
- Prime and base. After primer, sweep a sheer layer of soft apricot #F6C9A8 over the lid with a pressed powder shadow to even out the base.
- Lay a two-tone lid. Pack soft blue #98D5EA across the inner two-thirds with a flat shader brush, pressing rather than sweeping for even payoff, then place peachy lilac #D9C2C0 on the outer third. Blend only the seam where they meet so each color stays clear.
- Glitter the inner lid. Press champagne glitter shadow #E8C98F into the inner third, patting it over the soft blue. Press, do not sweep, so the flakes sit flat and the blue still glows through.
- Burst the inner corner. Pack buttercup #F3D98A into the inner corner and blend it up slightly to throw light forward. Then sweep away under-eye fallout and clean up any glitter stray with concealer in one pass, so the base is clean before you lay any graphics.
- Map the graphics. With warm camel #C9A57C on a fine brush, lightly sketch three elements: a floated line just above the crease, a long comet tail trailing off the outer corner, and a finer line running parallel below the first. Mapping in a soft shade first means you only commit once the spacing looks right. If the camel is hard to read over the glitter, map with a slightly denser hand or a cooler taupe.
- Lay the lines in coral. Trace over the map with a gel or liquid liner in peach coral #F58A6E. Draw each line in one smooth pull from the inner to the outer end so it tapers cleanly: keep the main floated line crisp, the comet tail long and pointed, and the parallel line thinner. For a clean float, anchor your hand and follow the natural curve of the crease.
- Add a peachy-pink underlayer. Run a thin band of peachy pink #F6C3B0 just beneath the main coral line with a small flat brush, so the graphic reads as a layered ribbon rather than a single stripe.
- Mirror it below. With the coral liner, draw a fine peach coral #F58A6E line along the lower lash line to echo the upper graphic, dot champagne #E8C98F flecks along it, and add a tiny soft-blue #98D5EA flick at the outer lower corner.
- Define in camel. Tightline and keep it tidy so the floated graphics stay the hero. No black.
- Finish with lashes. Add a dramatic wispy brown lash and press champagne glitter shadow #E8C98F into the inner corner and along the brow bone.
Comet Storm shows graphic festival liner works in pastels: a soft blue lid and floated coral lines read as bold structure, with warm camel doing the defining job black would usually take.
Look 3: Wildflower Riot
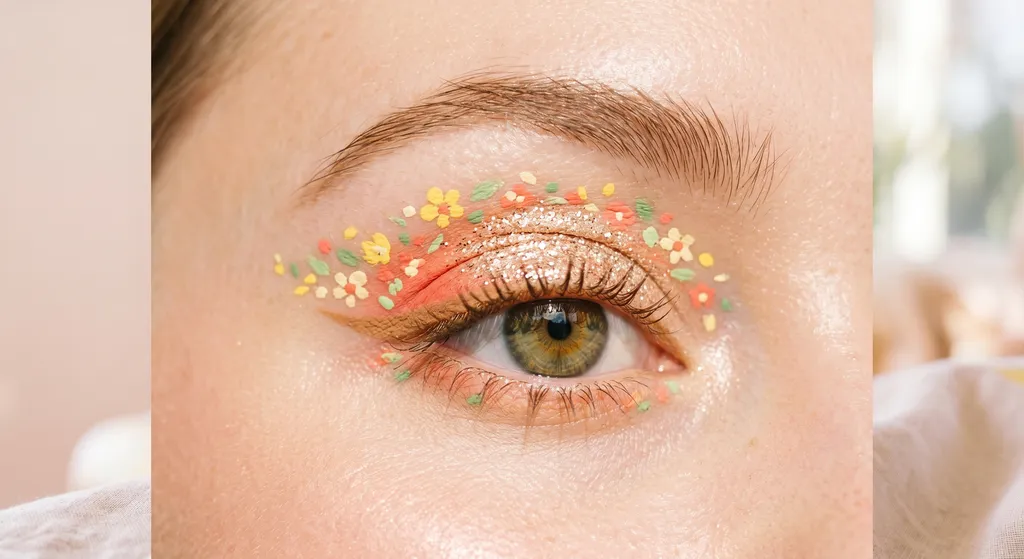
A green-led, hand-painted botanical eye: a meadow scattered across the lid with coral wildflowers, grass-green stems, and a champagne center. This is the most detailed look of the three, so save it for when you have time and a fine brush.
Light Spring Palette
Best Colors
Neutral Colors
Difficulty: Advanced, and the most demanding look here. Set aside real time.
- Prime and base. After primer, set the whole lid with warm cream #FBF3E6 pressed on with a flat brush, so the colors that follow stay clean and true.
- Build a full color field. With pressed powder shadows, press buttercup #F3D98A across the inner third, peachy pink #F6C3B0 across the center, and leaf green #C2D08A across the outer third and up into a lifted crease. Press the color in with a flat brush and blend only where two shades touch, so the fields stay distinct.
- Cut the crease. Load grass green #B3C271 on a small fluffy brush, tap off the excess, and carve a defined crease just above your natural one, working in small back-and-forth strokes and pulling the color up and out past the outer corner. Keep the top edge soft and diffused while the lower edge stays sharp, so the crease frames the lid without a hard line.
- Glitter the center. Press champagne glitter shadow #E8C98F into the center of the lid, patting it on with a fingertip or flat brush for a dense, reflective pool against the matte field around it. A bonded gel or cream glitter holds tightest here; press a second coat once the first tacks. Then sweep away any glitter fallout on the surrounding matte field and under the eye, so the surface is clean before you paint the flowers.
- Paint a dense floral cluster. Switch to a fine detail brush and a liquid eyeshadow or gel liner. Layer little five-dot flowers in apricot coral #F3A892 and peach coral #F58A6E with buttercup #F3D98A centers, varying the sizes and letting some overlap. Let each flower dry before adding its neighbor so the colors stay crisp.
- Add stems, leaves, and trailing detail. With a hair-thin grass-green line, flick fine stems and leaves between the flowers, sending a few trailing up toward the brow bone. Thin liquid or gel formulas give you the control powder cannot.
- Draw a floating accent line. With peach coral #F58A6E, trace a thin floated line just above the crease, following the top of the floral arrangement like a border. Anchor your hand and pull it in one smooth pass.
- Define in camel. Tightline the upper lash line, then add a soft, elongated warm camel #C9A57C wing that follows the green crease outward.
- Bring drama to the lower lash line. Smudge leaf green along the lower line, paint two or three tiny coral flowers at the outer lower corner, and set a buttercup #F3D98A dot at the inner corner.
- Finish with lashes. Add brown dramatic lashes, or layer up your natural ones, and press champagne glitter shadow at the inner corner and brow bone.
Wildflower Riot proves Light Spring can do dense, painted maximalism: warm greens and corals stand in for the usual neon, and a champagne center carries the sparkle.
Why Light Spring swaps black, gems, and silver
Now the reasoning, if you want it. Every look above leans on three swaps that keep festival maximalism inside warm, light, clear coloring. Here is the full shade set the looks draw from, then why each swap matters. For the everyday version of these tones, see your full Light Spring palette.
Light Spring Palette
Best Colors
Neutral Colors
Warm definition, never black
Definition is what stops a colorful eye from sliding into chaos, but on Light Spring coloring black is the wrong tool for it. Reach for warm camel #C9A57C instead, tightlined and pulled into a soft wing. Multiple Light Spring references land on the same advice: choose brown or gray over black for liner and mascara, because black reads almost aggressive against light, warm coloring and shrinks the eye rather than opening it. A warm camel line does the structural job of kohl while staying in your palette. For shade-by-shade liner picks, see our eyeliner by color season guide.
Warm camel is your festival kohl: it defines and elongates without the harsh contrast that black creates against light, warm coloring.
Painted detail, not glued gems
The stick-on gem is a festival staple, but adhesive crystals near the eye are both a Light Spring mismatch and an eye-safety risk. Loose beads and rhinestones can shed into the eye, and the glue is not formulated for that delicate skin. Swap them for two things that read just as ornate on camera: pressed glitter shadow and hand-painted detail. Tiny painted florals, confetti dots, and micro-stars give you the density and sparkle of an embellished look with nothing adhesive sitting on the lid. Keep anything glued well away from the eye area.
Hand-painted florals and confetti plus pressed glitter shadow deliver the embellished festival effect without putting adhesive gems near the eye.
Warm sparkle, not cool silver
Sparkle is the heart of a festival eye, so the temperature of your glitter matters more than anything. Cool silver and icy holographic shades flatten warm, light skin and pull it gray. Warm glitter does the opposite. Champagne #E8C98F gives you a reflective, golden-lit center, and buttercup #F3D98A brightens the inner corner like a spotlight. Both bounce light warmly against your skin instead of cooling it down.
Champagne and buttercup are the festival sparkles for Light Spring: warm, reflective, and skin-flattering where cool silver would go gray.
Make Light Spring festival makeup last
A festival eye has to survive heat, dancing, and a long day, and warm, light coloring needs that staying power without falling back on black or cool tones. Layering is what holds it. Start with eye primer, set your base color, then press your matte shades and glitter shadow on in thin, firm layers rather than one heavy pass. Bonded gel and cream glitter shadows lock down as they set, so a light first coat plus a pressed second coat gives you density that lasts. A fine mist of setting spray at the end ties everything together.
Keep the definition warm throughout: brown or warm camel, never black, for liner and lashes, so the look stays in your palette as it wears. For anything near the eye, choose formulas made for the eye area and keep product off the waterline and out of the lash line. That is the same logic that rules out glued gems and loose glitter: nothing that can shed or migrate into the eye.
Layering is what makes a Light Spring festival eye last: primer, set base, matte color, then glitter shadow pressed on in firm coats and locked with setting spray, all held together by warm brown definition.
Not a Light Spring? Quick swaps
These looks are tuned to warm, light, clear coloring, so a different season needs a different palette, not a warm-and-cool mash-up within one eye. Each swap below keeps a single temperature so the look stays coherent.
If you are a brighter, clearer Spring, push everything toward saturation: deeper corals, a more vivid grass green, a clearer blue, and a brighter buttercup. The structure stays the same, the pigments just turn up. See the Bright Spring palette for the right intensity.
If you are a warmer True Spring, lean into golden warmth: trade peachy lilac for a warmer apricot, push the corals toward true warm coral, and keep the gold and champagne front and center.
If you are a Light Summer, cool the whole thing down as one set: shift the corals toward soft rose, swap warm camel definition for a cool taupe, and choose a cooler periwinkle over this look's soft blue. Keep every shade on the cool side rather than mixing in the warm corals.
Adapting these looks across seasons means re-pitching the whole palette to one temperature: warmer and clearer for Bright and True Spring, cooler and rosier for Light Summer, never warm and cool blended inside one eye.
Frequently Asked Questions
Light Spring festival makeup is maximalism without compromise: keep the definition warm, the glitter warm, and the embellishment painted, and you can go as bold as any festival look while staying entirely in your season.
Not sure you're a Light Spring? Find out from one selfie
BeautySpark confirms your color season and builds eye looks around your Light Spring palette.